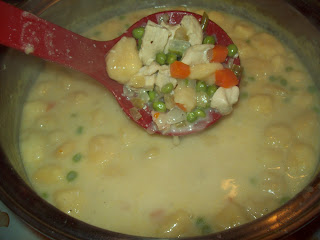
Homemade Chicken and Dumplings

Wednesday, December 29, 2010


I know it's been a really long time since I have blogged-- Almost a month actually. I have to apologize to you all. I was so dedicated to this blog at first but then I just got so busy with work, taking care of my daughter, hanging out with friends, spending time with my future husband, and getting ready for school that I really just haven't had time for anything else. Or maybe I've had time for everything else and none for blogging or cooking. Oh well. I apologize. Sadly though, with me starting school again next week, I'll have even less time to cook or make blogs. The days that I won't be in school I will be working and the days I'm not working I will be in school. Ugh! When will I ever cook again?! :( 

So anyway, on a lighter, cuter, and sweeter note, I have an introduction to make. Her name is Autumn and she's the love of my life. I know I don't have a whole lot of pictures on here so what I am going to try to do is introduce you to all of the most important people in my life, one blog at a time!

This is my precious baby girl:


And she helped me cook this fantastic recipe! I have to brag too... Besides her being just absolutely freakin' gorgeous (yeah, so what? I'm a little biased... at least I'm right! :)), she's an amazing little helper too! :)


Okay, so I can't lie to you in tell you that this is my recipe even though I would pay money to let the creator give me credit for it. Yes, my friends, it's that good. I found this recipe a few years ago and I have never had anyone complain. This has always been a hit anywhere I have ever taken it! I got this recipe from cooks.com and I didn't even tweak it. Honestly, there really isn't a need to at all. The only time I have ever changed this recipe at all is when I made my own dumplings. It turned out fine but it was too much work, so from then on I have always stuck to this recipe, word for word. I'm telling you now... It's wonderful.

I have also been told by a couple of people that I should try making this recipe, minus the dumplings, and try making a chicken pot pie out of it. When I have time to do a little research on making a pot pie, I am going to do just that!

INGREDIENTS:

4 boneless skinless chicken breasts
2 Knorr chicken bouillon cubes (or 4 regular chicken bouillon cubes)
1 can cream of chicken soup
1 can cream of celery soup
1 5 oz can evaporated milk
1 small onion
1/2 package of frozen peas and carrots (I usually use fresh carrots finely diced and frozen peas)
1 can 10 count biscuits
whole milk
salt and pepper

I always start by cutting my raw chicken into cubes and then boil chicken first. Once it's done I drain the water down to about 3-4 cups, take out the chicken, add the bouillon cubes to let them dissolve, and then re add the chicken.


 Then I add my milk and salt and pepper just like the recipe states. I suggest not adding much salt at all because the other ingredients that are added in have a high sodium content which makes up for the lack of salt added in the beginning.


Again, as suggested in the recipe, I add my peas, onion, and my cream of- soups


Once all of the above ingredients are added and incorporated well, I let this boil for about 7-8 minutes. Now, in the recipe it suggests that you cut your biscuits into fourths, but I don't like my dumplings that big at all so I always cut mine really small. They always expand to become much larger, anyway!


I usually only add about 5-6 of the biscuits into my soup because if you add all 10 of them, it's a little excessive, especially with the way I cut my dumplings, but I like it like that, so use your better judgement once you look at the pictures below.


Once my dumplings are added, I allow my dumplings to boil in my soup for about 10-15 more minutes. After I let my dumplings finish cooking, I add my evaporated milk and gently stir.


This recipe could easily feed my family for 3 days. I would say that it's easy to get about 10 servings out of this.


This recipe is excellent for a cold winter night or when you need the comfort of a good, hearty soup. Try it. It's sure to please!


Happy Eats!

Pepper Steak Stir Fry

Monday, December 6, 2010

Hey guys! I want to start off by apologizing to you about not blogging in a few weeks. I've just been so busy with getting registered for school, working, and spending tons of time with my daughter that I really haven't had a chance to do anything else. I'm hoping to be back in full force with the blogging now, but it's likely to come to an abrupt halt once school starts back in January. I will be blogging as much as possible, but in the likely event that I won't have time to cook, I won't have time to blog. I hope you understand. Don't leave me; I'll still be here and cooking to share, just around a very busy schedule! :)

So... About this Pepper Steak Stir fry! I found this recipe about two years ago, tweaked it, and my family has always enjoyed it ever since. It's one of Stacy's favorites, and my daughter loves it too. I am about to share with you how I make this recipe instead of following the one on http://www.cooks.com/.

MY INGREDIENTS:

1 lb pork roast or beef flank, cut into thin strips

2 Bell Peppers, cut into thin strips

1 large onion, thinly sliced

olive oil

2-3 garlic cloves

1 tbsp butter

1 fresh container of pre-sliced mushrooms (optional)

2 tbsp flour

1 beef bouillon cube

black pepper

soy sauce

water

DIRECTIONS:

I start by heating enough olive oil that will cover the bottom of my large skillet (about 2-3 tablespoons) and then adding butter to melt into it.


Once my oil and butter heat enough, I add my onions and let them saute for a couple of minutes.


Then I add my bell peppers and whole garlic cloves. When the garlic starts to get a slightly glazed look, I crush them with the tines of my fork, like suggested in the original recipe.


I let the vegetables saute for about a minute more, but not long enough for the bell peppers to be too... flimsy (for lack of a better word). When the vegetables are finished, I take them out with a slotted spoon. When all of the vegetables are set aside, I add my meat (this time I used pork roast) into the oil and let it cook several minutes before adding the mushrooms.


I usually let my meat cook on medium heat for about 10-15 minutes and take it out with a slotted spoon as well to set aside with my vegetables. Next, I turn my heat to a very low temperature and add flour into my broth that has made on its own while the meat was cooking. Then I stir my flour into my broth to make it into a thick texture. Once it becomes a clumpy thick texture, I add about 1-2 tablespoons of soy sauce and about 1/2 a cup of water or more until I find the consistency of gravy I like. With this particular recipe, I make my gravy pretty runny so that I can pour some over the rice I eat with this. 


   Next I add my beef bouillon cube and let it dissolve into the gravy.
This is what I like my gravy to look like:


After I get my gravy to the right consistency I add black pepper, stir it well, and then put all of my vegetables and meat back into my skillet. I then toss all of this until all of the meat and vegetables are covered in gravy, let it heat for about five more minutes, and it's done!


After the meat and vegetables are hot, I serve it with a bed of rice.


I actually got really hungry doing this blog post. I wish I could eat some of this right now!

Speaking of eating; I'm doing so well on my whole diet! I have cut down eating, counted calories, and drank tons and tons of water every day. I'm well on my way to being thin again and I'm so proud of myself! Keep a lookout for blog posts on my diet plan because I plan to keep you all posted on my progress!

Happy Eats!


Weight Loss Begins TODAY!!!

Wednesday, December 1, 2010

For as long as I can remember, I've always been labeled as the skinny girl. The girl who always made others sick because instead of not being able to lose weight, I was never able to gain weight. Before now, the most I had ever weighed outside of pregnancy was 135 lbs. I looked good back then. I had a little butt, some meat on my bones, and I was confident.

Back in high school, I weighed 105 lbs soaking wet. Everyone always gave me grief because I was too skinny so I decided to get on the Depo Provera  birth control shot because I'd heard that people gained weight on it. I started the shot in May of my sophomore year and when I can back to school in August, I had gained almost 15 lbs. I couldn't help smiling when  people told me how much better I looked.

When I got pregnant with my daughter, I weighed 120 lbs.  At the end of my pregnancy, I weighed 165. A week after I had Autumn I weighed about 135 lbs. Today I am not much less than what I weighed when I was at the end of my pregnancy. As a result of my weight gain that has occcured within the past year and a half, I am no longer confident, I don't feel pretty anymore, and none of my clothes fit.

I am sick of looking in the mirror and not liking what I see. I am sick of going through my closet and not being able to wear any of my cute clothes anymore and I'm sick of always wearing t-shirts. I am SICK of being asked if I am pregnant and knowing damn well I look about 7 months along. But most of all, I'm sick of bitching about it and not doing anything at all. 

I can't blame my weight gain on having a child like most people can. I can't blame it on anyone but myself because I did it. I'm determined to lose this weight and lose it as fast as possible without being unhealthy. It just makes me sad because all of my life, I have been able to eat whatever I want and not worry about any consequences occuring. I have no excuses anymore. I have no reason not to lose weight.

I want to be sexy again. I want to get those looks from guys again because whether you're in a relationship or not, you know it's always nice to get stared at or know someone is looking. It's not being cocky, it's being confident. And I have always been confident... until now. 

So here I go. I'm making a change. I have never been able to stick to a diet or exercise before but I have to do this. I have to feel pretty again. The depressive slump I have been in for almost a year now isn't cutting it. I have to do this for me, but most of all I have to do this for my daughter because she is suffering from my depression too!

MY GOAL:


I WANT TO LOSE TEN POUNDS A MONTH UNTIL MY BIRTHDAY. I plan on doing this by:

1. Drinking lots of water. I just looked on an online calculator and I need to be drinking about 3 liters of water a day. That's a lot of damn water, but I am determined!

2. Eating small meals. As you all know, I love to cook. And I don't cook healthy. That has to change. My fiance is going to hate me for this, but it will benefit us all in the end.

3. NO MORE SWEETS, DAMMIT! I'm not a big sweets eater anymore anyway, but when I want something I go for it. I guess that calls for more:

4. SELF CONTROL. You have no idea how hard it is for me to learn self control. Whether it's me opening my mouth for something I shouldn't be so opinionated about or eating whatever I want, I've got to to learn to have more self control.

5.  NO MO' BEER! I mean it man. That's probably why my belly is so big. When I get off of work, I like to have a beer or two. I also like to go out and have a few beers with my friends. I'm changing this starting today. A beer every once in a while is alright. I will not be doing it several times a week anymore.  (Man, I hope I can stick to that one!)

So there. Those are my goals. I also plan on exercising as much as possible. And any kind of exercise would be an improvement from the lack of which I am accomplishing now.

I am hoping that by my birthday I will weight between 120-130 lbs.

So it starts now!

LET'S DO IT!

Pancit Bihon (Filipino Noodles)

Monday, November 15, 2010

I found a picture a while back of my 16th birthday dinner where I was blowing out my candles and there was tons of Filipino food surrounding my cake on the table. It made me reminisce back to those days and miss them so very much; especially my mom who made all of those delicious meals! After finding the picture, I made it my goal to try to cook (and master) all of the Filipino dishes my mom and other family members used to make. 

Since I set my goal, I've mastered a few of the Filipino dishes; one of which is Pancit Bihon. This is yet another of my childhood favorites that most Filipinos can't get enough of. Whether the occasion is Christmas, Thanksgiving, a birthday, or just a family get together, my mom always made enough of this to feed my whole family and still had leftovers for me when they left! This is mainly used as a side dish, but I like eating it by itself as well!

Pancit Bihon is a noodle dish consisting of various vegetables with either chicken or pork. This very simple dish seems to satisfy people from many different cultures. I remember different people coming to my family's homes to have dinner with us on our many different occasions and truly enjoying this dish, so here I am to share it with you!


INGREDIENTS:

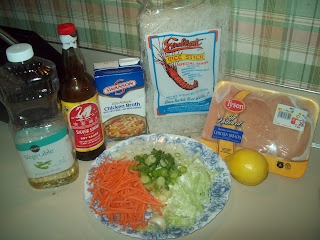
1 package Excellent Rice Stick Noodles (found at most Oriental stores)

2 boneless skinless chicken breasts, shredded

3/4 cup shredded, carrots

3/4 cup shredded, cabbage

1 small onion, chopped

1 scallion stalk, sliced

2 cloves garlic, crushed

3 cups chicken broth

about 5 tbsp soy sauce

3 tbsp vegetable oil
salt and pepper to taste

1 lemon


DIRECTIONS:


I first started by boiling my chicken for about 25 minutes until fully cooked. While my chicken was cooking, I shredded and chopped my vegetables. Once the chicken was full cooked, I started sauteing my onions and garlic in the vegetable oil for about one minute.


I then poured in my chicken broth.


Next, I added the rest of my vegeatables, soy sauce, salt, pepper, and shredded chicken.


Once my vegetables were placed, I let them boil for about 5 minutes and then I added my rice noodles, which I broke in half. (If you make this recipe, you'll see what I mean about breaking the noodles in half because the bundle of noodles are long and won't fit in your pan properly.)


My final step was to let the noodles boil down for about 3-5 minutes until they were soft. This recipe really takes no time once the chicken is cooked. When the noodles are soft, easily move around the pan, and most of the liquid is absorbed, the recipe is done. I usually eat this dish with chicken adobo or barbeque with a side of rice and my Lumpia. You'll want to squeeze a slice of lemon on top of the Pancit and...


Voila! Pancit Bihon is served!


Loaded Baked Potato Soup

Tuesday, November 9, 2010

With the changing of the weather here in Alabama, my daughter and I weren't feeling very well last week so I decided to make us something soothing and warm to help us out and get us feeling a little better. It was the night of Halloween, it was a little chilly outside, and with us having a cold, I thought it would be the perfect time to make some soup. I've done this recipe a couple of times before and Stacy loves it as well so I figured why not!

I got a couple of recipes online that helped me figure out how to make this recipe on my own with my own twists.

INGREDIENTS:

1 package hickory smoked bacon

1 cup sour cream

1/4 cup flour

3 cups chicken broth

4 baked potatoes

salt and pepper to taste

1 tsp basil

1 cup shredded cheddar cheese

1 clove garlic, minced

1 small onion, chopped

1 can cream of potato soup


DIRECTIONS:


I begin baking my potatoes in the microwave with the baked potato setting based on the number of potatoes that I am making. I usually bake my potatoes in the microwave until I can easily stick a toothpick into the potato. Once the potatoes are done, I chop them into 1 inch pieces.

 I then fry my package of bacon in my cast iron skillet. In the past I have used a package of Real Bacon bits and then just fried a few pieces of bacon for garnishing purposes but this time I thought it would be better with all of the bacon being home cooked.


When my bacon was done, I drained off most of the grease but reserved about two tablespoons for sauteing my onions and garlic. I always make sure to saute my onions for a minute or two longer than my garlic so that I don't burn the garlic because garlic cooks fast!


After I got my onions to the consistency that I wanted them, which is not mushy, I added my flour. This is the part that makes the gravy. I usually add a little more cooking oil when I make my flour so that I can get my rue to a very thick consistency. 


Once all of my flour is clumpy and wet with grease, I start making my gravy by slowly adding the chicken broth. Also, when making homemade gravy, make sure to turn the heat down on your stove to the low setting.

Once I finally got my gravy to the thick consistency that I wanted, I added my cream of potato soup which also helped in getting the soup to the thickness I like it. This is also the step where I added my basil, salt, pepper, and baked potatoes!


Next, I added my cup, or so, of sour cream.


Then I added most of the  bacon...


 Once all of that was done, I let the soup simmer for about 5-7 minutes on medium-low heat. I then garnished it with the cheese, bacon, and parsley.


This definitely made Autumn and me feel better after eating it. It's so comforting and it has become a regular meal at our home during the winter time!


Bacon Cheddar Cream Cheese Ball!

This is the best cheese ball I've ever put into my mouth. Sadly though, I can't claim it as my own. I was given this recipe by one of the children's mothers that I used to take care of at the daycare I used to work at. I remember her bringing a cheese ball in for all of the teachers. (Shh, don't tell anyone but the other teacher that shared the room helped me eat all of it by the end of the day! ;))
INGREDIENTS:

12 oz cream cheese, softened

1 cup shredded cheddar cheese

1 tsp Mrs. Dash Original

1 small package Real Bacon Bits (about 1 cup)

1 cup chopped walnuts

Directions:

It's just this easy:

All you have to do is mix the first four ingredients up, for that into a ball, and then roll the ball in the walnuts. Once all of this is done, simply refrigerate your cheese ball overnight and you're done.


-Best served with crackers. :)


Yes, I know these aren't the best pictures. I'm not the best photographer. I'm going to have to get a new and better camera along with some pretty serving platters. (Cough* Hint for Christmas presents *Cough) :)

Mexicali Skillet

Thursday, November 4, 2010

This recipe was given to me a few years ago when I first started cooking. This is probably Stacy's absolute favorite recipe, which surprises me because he is so picky. I've introduced this recipe to a lot of different people and they all have enjoyed it so now I am here to share it with you guys. It's very good!


INGREDIENTS:

1 small onion, diced

1/2 lb ground beef

1 package cocktail sausages

1 can stewed tomatoes, undrained

1 can pinto beans, undrained

1 can green chilles

3/4 cup white rice

1 tbsp chili powder

1 cup water

1 cup shredded cheddar cheese

Salt and pepper to taste

1 can mushrooms (optional)

A few splashes of Frank's Hot Sauce (optional)


DIRECTIONS:

I start by sauteing my onions for about two to three minutes until soft. I then remove the onions and brown my grown beef. Once the ground beef is done, I throw in all of the other ingredients, including the  sauteed onions. I let all of this simmer for about 20-25 minutes on medium to medium-low heat. I stir it occasionally so that the rice doesn't burn to the bottom of the pan. You'll know your dish is done when the rice is fluffy and you can bite into it without it being hard. Duh! ;)


Yep, this recipe is that easy. This simple little dish will serve about 6 people easily. I love it so much because it has so much flavor and I absolutely love cocktail sausages!


Enjoy!


About Me

My photo
I am a mother, soon to be wife, and daughter. I'm half Filipino and half American and was raised in sweet home Alabama. I have a passion for cooking food and I'm here to blog about it!
Powered by Blogger.

FilipinaFoodista Copyright © 2009 Designed by Ipietoon Blogger Template for Bie Blogger Template Vector by DaPino